
The Ferret Mobile
by Sheila Crompton, Bolton Ferret Welfare
Ian, the Puppet Man, had been on at me for over 12 months regarding fitting out my Transit van for transporting the ferret cages and equipment. At Thoresby Craft Fair in October 2007 with Ian helping me to unload the cages, he finally convinced me that his ideas would work.
After we’d finished unloading the ferrets and got them settled in the marquee, Ian took some measurements and reckoned that down one side I could get six cages in two tiers. The other side would have four leaving a bit of space for the ‘living/kitchen area’.
We both went into the ferret marquee, put the kettle on and settled down with paper and pencil to make a rough draft of the proposed layout. Ian suggested the best time for him to do the work was in January as it was a pretty quiet time for him and the Pinxton Puppets.
What really convinced me that the modification was needed was the hard frost we had every night at Thoresby; I was sleeping in the van and squinting at the thermometer in the mornings (32F or for those of you who prefer, 0C) did nothing to encourage me to crawl out of a toasty warm sleeping bag. The marquee was freezing, ice on the inside from condensation! It was even too cold for my little gas fire; the gas had frozen! Fortunately the one in the gas stove did work OK. The ferrets were fine, they’d been happily snuggled down in their beds but we had to leave them covered up because of the drips from the thawing ice.
2nd January 2008 I arrived at Ian’s home in Pinxton ready for the work to start on the van. The ferrets were off-loaded and put in the large greenhouse, along with some of the other equipment. Racing pipes, etc. were stored in the garage. We then retired inside to work out a plan of action and estimate how much timber would be required.
The following day Ian drove to the timber yard and I bought 1”x 2” lengths of pine to build the framework for the bunk bed which would be the first thing to be constructed. I’d already decided on what I'd want to store under the bunk: generator, cables, etc and the portapottie (tramping across a show ground in the middle of the night isn’t my idea of fun, especially when its raining!). I'd suggested building the bed with a piece of thick ply however, Ian vetoed that idea and went for a frame with 1"x2” slats fixed across it; the whole thing would pivot on two bolts allowing access to the storage area. Clever.
Once the main ‘box’ had been constructed it was placed in position inside the van; but not without a struggle and some gentle persuasion, (hit it with a big ‘ammer!). The actual bed frame was fixed into place to check that it pivoted OK and some of the slats were attached, the rest to be added with ‘off-cuts’.
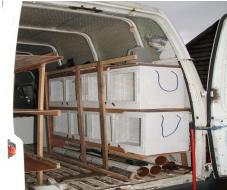 The frame work for the cage racks on the near side were made up
and fixed in position. Then one of the cages was slid onto the rack.
The sloping sides of the van didn’t make things easy so it was
always a case of make it and then adjust accordingly. Once the
near side rack was sorted, it was then a case of constructing the off
side one. It was decided that using the same type of cages
wouldn’t work, so it was off to the wood yard again for more timber.
The frame work for the cage racks on the near side were made up
and fixed in position. Then one of the cages was slid onto the rack.
The sloping sides of the van didn’t make things easy so it was
always a case of make it and then adjust accordingly. Once the
near side rack was sorted, it was then a case of constructing the off
side one. It was decided that using the same type of cages
wouldn’t work, so it was off to the wood yard again for more timber.
Having to construct new cages put us behind schedule so we could really have done without the 'flood alert!' Debbie came back after flying one of her hawks to say that the river was about to burst its banks and that the bottom of the lane was flooding. I checked and sure enough the lane was flooding; within half an hour the drain was backing up and the manhole cover down the lane was being lifted by the force of the water. The Special Constable went and stood on it but even his weight couldn’t keep it down! An hour later and the local council were round delivering sandbags. Operation 'flood alert' was underway; the ferrets thankfully were OK in the greenhouse. It was the start of the 'waiting game'.
The drain outside the kitchen door was beginning to make gurgling sounds as it started backing-up and the loo took ages to flush, always a bad sign. As you’ve probably guessed, it wasn’t the river causing the flooding but the darn sewers backing-up; too many new houses and no updating of the sewerage system! It eventually stopped raining, the drain stopped gurgling and everyone breathed a sigh of relief.
The cages were constructed and the racks made. Next came the ‘kitchen cupboard’, which had to have a steel frame because of the solid fuel stove. Ian had made my stove some years earlier for his own van; it works fine but needs more tending than his later models. It only has a 4”x4” firebox and a fairly small bore chimney.
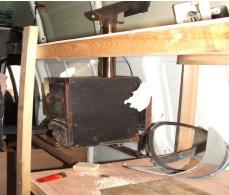 The position of the hole for the chimney was worked out and cut;
the steel frame wielded together, the stove placed on the ladder (it
has hooks on it that drop into position on the ‘ladder’ so it can be
easily removed), the chimney pushed through the hole and
positioned on the stove. A fire lighter was lit, dropped into the
firebox, kindling along with four briquettes added and once the
wood had all burnt, two more briquettes thrown on. Ian then did
his safety checks, including draping bits of tissue around the fire to
see if they got singed; the chimney had already been designed for
use through GRP so this was fine, just slightly warm. The oven door
was left open as it added extra warmth to the inside of the van. It's
only a small oven: heat up a small meat pie or do baked potatoes.
The position of the hole for the chimney was worked out and cut;
the steel frame wielded together, the stove placed on the ladder (it
has hooks on it that drop into position on the ‘ladder’ so it can be
easily removed), the chimney pushed through the hole and
positioned on the stove. A fire lighter was lit, dropped into the
firebox, kindling along with four briquettes added and once the
wood had all burnt, two more briquettes thrown on. Ian then did
his safety checks, including draping bits of tissue around the fire to
see if they got singed; the chimney had already been designed for
use through GRP so this was fine, just slightly warm. The oven door
was left open as it added extra warmth to the inside of the van. It's
only a small oven: heat up a small meat pie or do baked potatoes.
The stove and chimney were allowed to cool down, then removed. The kitchen cupboard and drawer were built up around the steel frame work. The finished unit was bolted into position, the repainted stove hung on the ladder and the chimney dropped into the position it would occupy when not in use. The small gas cooking stove was put in the drawer. The blanking plate for the hole in the side of the van was held in place by a spring. A cupboard was made to go above the foot of the bunk bed.
 One of the finishing touches was a visit to a garden centre for 12
metres of bubble wrap. It was cut to size and stuck into position with
double sided sticky tape (shades of Blue Peter!). What a difference
it’s made to the inside of the van; it’s warmer and no condensation;
great to wake up in the morning and not get an early morning
shower!
One of the finishing touches was a visit to a garden centre for 12
metres of bubble wrap. It was cut to size and stuck into position with
double sided sticky tape (shades of Blue Peter!). What a difference
it’s made to the inside of the van; it’s warmer and no condensation;
great to wake up in the morning and not get an early morning
shower!
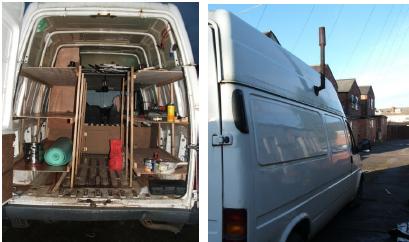
The racing pipes were slid into position under the racks; the rest of the slats cut and fixed onto the bed frame. The mattress (ex-caravan) was cut down by three inches, the cover re-stitched and put on the bed, very comfortable! The racing starting traps were placed in their storage hold on top of the near side rack, the pots, pans, plates, cutlery, etc went into the ‘kitchen’ cupboard along with a supply of tinned food. Ian made a sheet metal storage bin for the stove fuel that slides onto the bottom shelf; but also fits next to the stove when it's lit.
I did a bit of painting with the intention of finishing it when I arrived home, I’ve still not got around to it yet… not been too well; lacking the enthusiasm needed to unload the rest of stuff out of the van and find somewhere to store it.
The forthcoming show season should be a lot easier with the new layout; no more opening the back doors of the van and having things fall out! The first things out will be the playpens from the centre aisle, then I'll have access to all the cages. Ian made up a pole with a hook on the end to reach the furthest cages in the near side rack so I don't have to keep getting in and out to unload. I reckon it should take me about 90 minutes to get set up and that’s taking it steady, allowing time for a cup of coffee of course!